Contact
Cherokee Brick Blog
DIY: BRICKING A FIREPLACE WITH CHEROKEE BRICK- Kristen from White Farmhouse Haven
by Guest
Posted on December 14, 2020 8:09 AM
Between finishing up our home, getting all moved in and having our newborn, I’m finally starting to get back into the swing of things! If you tuned into our Instagram stories shortly before we moved into our house, you saw that AJ and I did a ton of finish work on our home ourselves. This included bricking our fireplace that is in our living room.
I had the pleasure of getting to partner on this fireplace with my friends over at Cherokee Brick, and let me tell you, they are absolutely amazing!! Some of my favorite partnerships are the ones where you not only work together but build a relationship together. They are an amazing company that treats all of their employees like family. You can learn more about their company’s amazing story on their website here.
AJ and I decided a long time ago that we wanted to go with a traditional brick style for our fireplace in our living room. There are so many stone options out there, but for us, the red traditional brick style helped us create a cozy space. I had been following Cherokee Brick for some time watching their stories and seeing all the cool things their customers have done, and I just had to reach out! I’m so glad I did because the Thin Brick selections were amazing!
It was hard to choose, but we narrowed it down to three different samples and then two. The final two were the Andersonville and the Old Macon. The Andersonville had more of a red tone to it and the Old Macon had a more brown tone to it. I always planned to do a German Schmear type look, so the red-toned Andersonville was the winner for us. The red tone would really pop through and create a warm, cozy look, and I loved how bright the white was on these bricks.
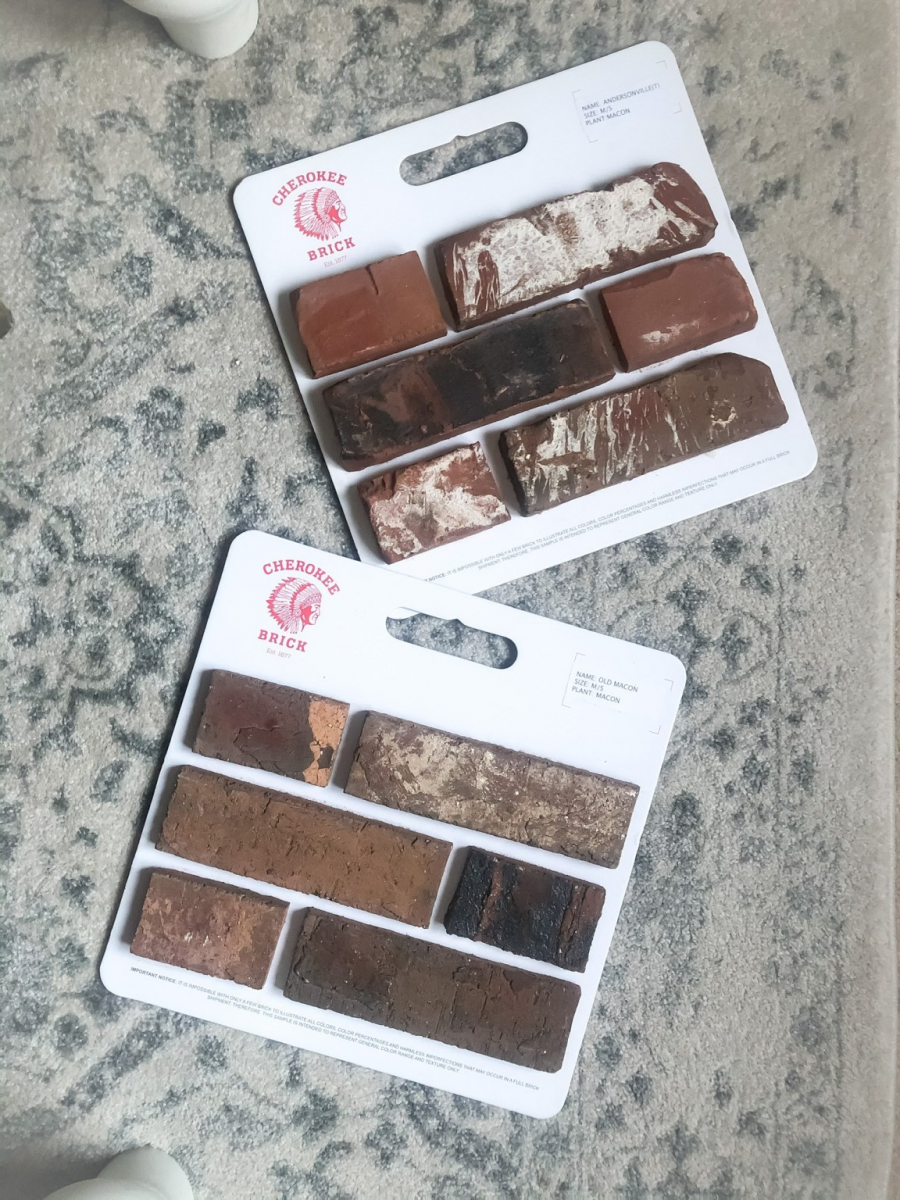
There are so many brick options with Cherokee Brick, so definitely go check out their page to see all the beautiful options here! I highly recommend getting a sample or seeing the brick in person, because we actually thought we were going to go with Old Macon until we saw the Andersonville in person!
This post is going to focus on the steps we took on finishing our fireplace, but I will also be working on a video to showcase this as well soon.
So…how did we do this? Let’s find out!
First, like any project, you will need to measure your space. This is something for every single project I recommend you take multiple measurements. Then measure again When you are putting your list together for materials, you’ll always want to add in an extra 10-15% to account for any mistakes made during the process. If you plan to do any patterns with brick or with tile, be sure to add in an additional 30% instead of 10-15%.
Second, create your list. Here are the materials and tools we used:
Materials & Tools List:
- Andersonville Thin Brick
- Mortar – We used a white mortar
- Bright White Grout – We went with the sanded grout
- Painters tape – To use against the wall and the floor, but make sure you pull this off before the grout dries when the time comes
- Buckets – The ones that each hardware store carries with their name on it are perfect, and you will need at least 5 (I’ll explain later in this post)
- Steel Ball Mixing Arms
- Dewalt 9-Amp 1/2-in Keyed Corded Drill
- Trowel
- Grout bag
- Plastic cup – This makes mixing the mortar and grout a little easier when you add in the water
- Sponges – Specifically for grouting
- Tile spacers – You could use really anything for this and we used multiple spacers to get the look we wanted up the wall
- Manual Tile Saw – We used this for any straight cuts on the thin brick
- Wet Tile Saw – We used this for the complex tile cuts. There are tons of these out there, but please make sure to take all safety precautions while using this. Both AJ and my brother were very experienced in using this.
Now let’s get into a few points about the fireplace area including the wall and the hearth…
First, since we had a bump out on our wall specifically for the fireplace, we were able to tile directly onto the drywall. However, we did have to create a hearth. AJ built this by using construction lumber and 1/4″ James Hardie Backerboard.
.png)
.png)
Here is the hearth with the backerboard added.
Making the hearth out of lumber and adding the Backerboard on top of it allowed us to add the brick directly to it. This part of the project took about two days to complete and one injury later. AJ actually cut his hand pretty good when cutting the Backerboard, so from our mistake, make sure you were some good construction gloves when using a knife and cutting this stuff.
Once we got to this point, we actually had to wait quite awhile before we could do anything else. In the meantime AJ got the trim, doors, and flooring done while the painter painted the whole place. AKA I got MUCH more pregnant during this time (lol).
Bricking the Fireplace:
At this point, we were working on tiling everywhere that needed to be tiled, including the fireplace (using thin brick is very similar to tiling). Due to the electricians being quite messy when they install lights, we wanted to wait to install our LVT flooring on the main floor and they come in once tile is complete. So you will see that we completed most of the fireplace but left the bottom of the hearth to complete until the floor was installed. We did this so there wouldn’t be essentially ugly gapping between the floor and the fireplace.
The beauty of using thin brick is we went for the thick grout line look, and this allowed us to not have to be so precise on where we laid the bricks. The spacing we decided on for grout lines was 1/2″ thick. We still wanted straight lines, but doing this thickness allowed for a little more error.
Steps to Laying the Brick:
- Mix your mortar: Have at least two buckets for this stage – one for water and one for mixing your mortar. We always have three buckets to put the mixer in water so the mortar doesn’t dry to it. You want the mortar to be like a cake batter consistency. You do not water it to be too watery as the bricks will not set.
- Cut your corner tiles for the hearth: We decided to cut the corner thin brick and make 45 degree angles. We preferred the look of this so we could have all corner bricks going across the hearth (see photo below for details)
- Add mortar to the brick and stick your thin brick to the wall: You can really do this method or apply the mortar to the wall and stick the brick to the wall. We did both methods throughout tiling in the house but decided to do it this way for the fireplace. If you choose to apply it to the wall, make sure you don’t do too large of an area at one time because your mortar will dry.
.png)
As you can see in the picture on the left, we also did our “accent piece” above the fireplace to ensure any brick around it butted up to that brick.
- Add spacers: When adding the spacers on the fireplace, we had to sometimes add more to an area because thin brick is not perfectly square. Again, we were going for around 1/2″ grout lines, but our main focus was to keep the brick straight and consistent on both sides of the fireplace. As you can see, we did not add spacers to the brick that laid on top of the hearth as it did not move.
- Mix more mortar: At multiple points throughout bricking the fireplace, you will need more mortar. Never mix too much mortar at one time. We always only had the bucket about 1/4-1/3 full of mixed mortar.
- Cutting Tile: AJ and my brother did have to cut tile with the manual tile saw and a wet saw. The wet saw was used for those corner pieces, and the manual saw was used for the pieces next to the fireplace unit.
- Attach the mantel: We attached the mantel before we bricked to the top. You can see in the above photos that we have steel sticking out of the drywall. This is something we added to make the mantel extremely sturdy. AJ drilled holes into the mantel, added construction adhesive, then we pushed the mantel into place. Then AJ used a level to ensure it was straight.
Once we were able to do the flooring in here, we were able to finish bricking the fireplace hearth and begin grouting. At this point I was 8 months pregnant, so my family was really helping us with a lot around the house including the fireplace.
.png)
Grouting the Fireplace with a German Schmear-like Method
Now this is the fun part, seriously. Yes it’s messy, but the grout is what started making the fireplace truly come together. We used some of the same materials we used for the mortar, but instead just had the grout mixture. Now I want to say that there are many different methods to grouting a fireplace and on what people do for the German Schmear effect, but this is what method we chose to do.
- Prep work: Tape off all areas you don’t want grout on including the wall, the floor, and the mantel.
- Mix your grout: This is very similar to the mortar but with a different material; however, you will definitely want three buckets for this process (make sure they are clean and free of any mortar, we use new ones). Have one bucket of water for your mixer, one bucket of water for your sponge, and one bucket to mix your grout. You will mix your grout and make sure the consistency is more like a thick frosting.
.png)
- Add your grout to your grout bag: This hands down is a 2-3 person job or get yourself something to put your grout bag in like a cup and fold over the sides. You will pour the mixed grout into your grout bag about 2/3 full. Remember, you don’t want your grout to be too runny or it’ll slide right through the grout bag and make a mess.
- Frost your grout lines: Not going to lie, this is a little hard due to the consistency needing to be thicker with having to grout the vertical grout lines. But you will squeeze out the grout into your 1/2″ lines and fill the grout to the top of the thin brick or even spilling over. Do not underfill as you need to have the grout come to the top. When it spills over, this is where you will be able to come back and smear the grout.
.png)
- Wipe the grout with a sponge: Next you will take a damp sponge and start smearing your grout all over. Don’t worry about going outside the lines, you can always remove or add more grout to get the look the way you want it. I took the sponge and mainly focused on flattening the grout to get it level with the brick, and also smearing on top of the bricks. Then I take my bucket of water, wash my sponge, and keep wiping the bricks until I get the grout to look the way I want it on the brick and in-between the bricks.
.png)
.png)
Ignore the fact that I’m not wearing any shoes. I didn’t plan on grouting this day but my brother was there and we just decided to start! So my Birkenstocks had to sit this one out since it was messy.
We kept doing this process until we had the whole fireplace grouted. As you see in the above picture, we didn’t do a full German Schmear but showed more brick. We did this with the fireplace so the red tones would really warm up the room. As you can see there are a lot of white walls, so we wanted some contrast.
.png)
And there you have it! One completed fireplace that we did all on our own. Something to keep in mind, we have NEVER bricked or tiled a fireplace before. Using the thin brick in our house was the first time we ever worked with that as well. It goes to show that with a little bit of practice on DIY work in our old house, it really helped prepare us to do all the of things in this house.
Doing things like this fireplace is going to be something we cherish while we are building a family in this home. Every single member of our immediate families and a few friends helped us through these projects. We had so many laughs, all learned something new, and created memories that will last a lifetime.
We didn’t plan on having our little girl while building this home, but that’s what happened and it made a lot of things more difficult. We had to complete things at a super rushed pace compared to what the professionals would have done, and this required AJ to work on the house for 12 hours a day every day for multiple weeks. It wasn’t easy, but we did have fun making memories and we wouldn’t change a thing. Now we are in our home with our little bundle of joy and continuing the projects.
.png)
.png)
Thank you so much for tuning into this blog post! I really hope you enjoyed it and that it is able to help you with your own DIY experiences. Be sure to tag @whitefarmhousehaven if you try out these steps! Don’t hesitate to send me an email with any questions at whitefarmhousehaven@gmail.com.
.png)